Wheel Fitment Check: How to Verify Before Every Sale
A complete wheel fitment check for shops — bolt pattern, center bore, offset, backspacing, and clearance — plus how to verify every set before you sell it.
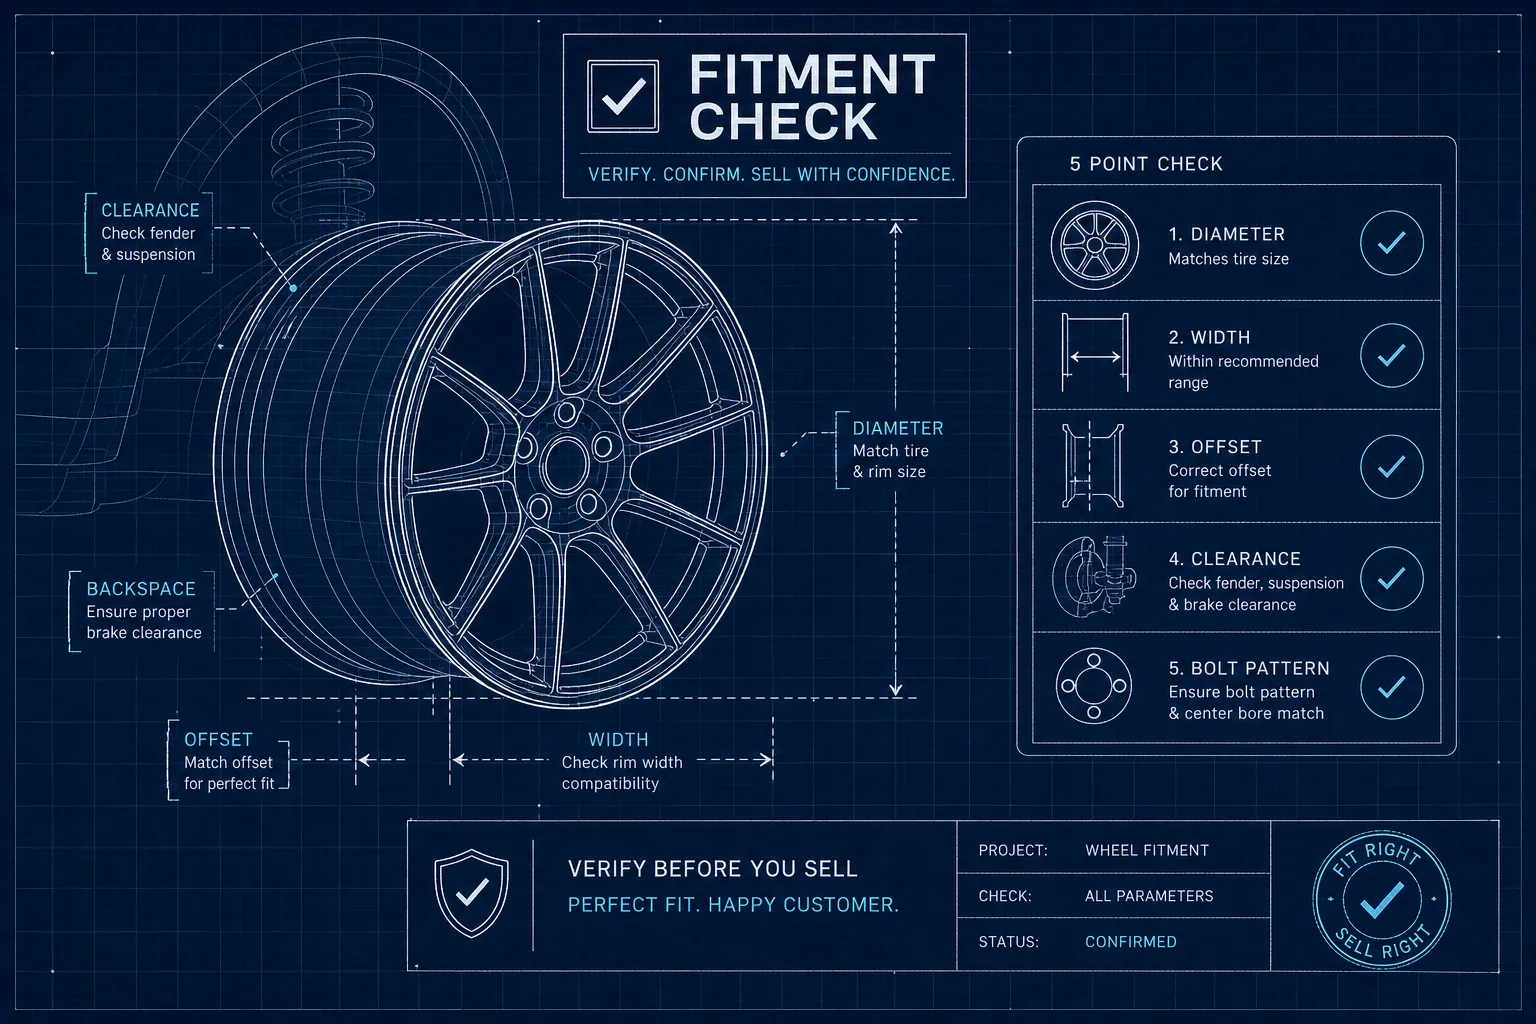
Selling the wrong wheel is one of the most expensive mistakes a tire shop makes, and it almost always comes down to a skipped wheel fitment check. Not a wrong guess — a skipped step. At RimFit we've watched it play out: a customer drives off with rims that looked right in the parking lot, then returns two days later because the wheel rubs the strut at full lock. The return eats the margin, the customer's frustrated, and the shop wasted two hours it didn't have. Between restocking fees (typically 10–25% of order value), lost freight, and a common $60 labor charge to unwind the deal, a single bad return costs real money — before you count the customer who never comes back.
This guide breaks down exactly what a wheel fitment check covers, how to run one accurately, and why building it into every sale protects your bottom line. No guesswork, no "it should be close enough" — just the specs that matter and how to read them.
The specs that define whether a rim fits or fails
Bolt pattern and center bore: the non-negotiables
These two either match the vehicle or they don't — there's no adjusting. The bolt pattern (PCD) is the number of lug holes and the diameter of the circle they form, like 5x114.3. If the wheel's PCD doesn't match the hub, it physically cannot mount. Center bore is the diameter of the wheel's center hole; it must match or exceed the hub's diameter, and if it's larger, hub-centric rings are required to prevent vibration.
For even lug patterns (4, 6, 8), measure center-to-center across opposing holes. For 5-lug patterns, measure from the center of one hole to the outer edge of the farthest hole — a bolt-pattern gauge eliminates the human error a tape measure introduces on odd patterns. For a primer on how bolt patterns are described and measured, see how to find your car's bolt pattern.
Offset, backspacing, and why they're tied together
Offset is the distance in millimeters from the wheel's centerline to its mounting face. Positive offset pushes the wheel inward toward the vehicle; negative pushes it outward. Backspacing measures from the hub mounting face to the wheel's inboard edge — and the two are linked: change one and you change the other. Together they control clearance on both sides of the wheel; get them wrong and the wheel either clears the strut by a hair or pokes past the fender lip. Either way, it's a return. For a deeper explanation, see understanding wheel offset and backspacing.
See it on your customer's actual car
RimFit turns a photo of the car + any set of rims into a photoreal preview in seconds — built for tire & wheel shops.
RimFit for shops →How to run a wheel fitment check: measure vehicle specs accurately
Measuring PCD and center bore
For even lug patterns, a steel ruler placed center-to-center across opposite holes gives the PCD in millimeters directly. For 5-lug wheels, measure from the center of one hole to the far outer edge of the hole diagonally across — or better, use a bolt-pattern gauge. Measure center bore edge-to-edge across the center hole, and record it precisely: a 73.1 mm bore on a 67.1 mm hub always needs hub-centric rings to seat, or the wheel runs slightly off-center and vibrates at speed.
Calculating backspacing and offset with a tape measure
To measure backspacing, lay the wheel face-down on a flat surface, place a straightedge across the inner barrel, and measure from the hub mounting face up to the straightedge — that's backspacing in inches. To convert to offset in millimeters, use the industry-standard formula that accounts for the bead-seat flange:
Offset (mm) = 25.4 × [ Backspacing (in) − (Wheel Width (in) + 1) / 2 ]
The "+1" accounts for the bead-seat flange convention; skip it and your offset is off by a meaningful margin. If you already have offset and width from the spec sheet, it runs in reverse:
Backspacing (in) = (Wheel Width (in) + 1) / 2 + Offset (in)
Convert offset from millimeters to inches first (÷ 25.4) before the reverse formula. Either direction, just don't drop the flange correction.
How clearance determines whether a wheel will actually rub
Inner clearance: suspension, calipers, and frame rails
The inner barrel has to clear everything behind the hub face — brake calipers, strut housings, control arms, frame rails. Measure from the hub mounting face to the closest obstructing component; the wheel's backspacing cannot exceed that number. A lower (more negative) offset increases inner clearance but pushes the wheel toward the fender; a higher (more positive) offset can contact the strut or caliper. This is the clearance issue that causes the most returns, because it's invisible until the customer turns the wheel at full lock.
Outer clearance: fender lips, liners, and sidewall bulge
Measure from the current tire's outer sidewall to the fender lip — that's your working gap. Any wider width or lower offset eats into it. As a practical minimum, plan for at least 12.7 mm (0.5 in) of clearance per side; for hard cornering, rough roads, or lowered suspension, 19 mm (0.75 in) per side is safer. Sidewall deflection under load closes gaps that look fine when the car is sitting still — which is exactly what sends customers back to your counter.
When the fit is borderline — and what you can do about it
Wheel spacers: when they help and when they create problems
Spacers reduce offset by their exact thickness, pushing the wheel face outward — a legitimate fix when a wheel sits too close to the strut or needs a small change for flush fitment. Extended studs are typically recommended beyond 5 mm, and for larger applications a hub-centric spacer with built-in studs is the correct approach, not a standard shim. What spacers don't solve is outer clearance: if the tire already sits 4 mm from the fender and you add a 5 mm spacer, you've guaranteed a return. Know which problem you're solving first.
Fender modifications and suspension adjustments
Fender rolling removes the sharp inner lip that contacts the sidewall on compression — needed for wider tires or when spacers push the assembly out. Fender pulling is a more aggressive version for extreme width or severe negative offset. Suspension tweaks (spring rates, bump stops) control how far the wheel travels into the fender; sometimes a stiffer spring prevents contact that fender work alone can't fix. None of these are exotic — but they're modifications that must be disclosed to the customer before the sale, not after.
Using a fitment tool: calculator and visualizer
What to input and how to read the output
A fitment calculator needs your current setup (width, diameter, offset, tire size) and the proposed setup, then shows three things: change in inner clearance, change in outer position, and change in overall tire diameter. The first tells you if the wheel will contact suspension; the second, how much closer to the fender the tire sits; the third affects speedometer accuracy and ride height. These give a directional answer — physical measurement on the actual vehicle still confirms it, especially at full lock and full compression. The calculator says whether to proceed; the hands-on check says whether it actually works.
Where AI fitment tools change the workflow entirely
Manual calculators work, but they put the burden on the employee to gather every spec, enter it correctly, and interpret the result — three places errors creep in. RimFit's AI-powered fitment check compresses that into one automated step: before a quote is even built, it cross-references bolt pattern, offset, and clearance against the customer's vehicle and flags any mismatch automatically. The employee doesn't need the formulas; the check runs in seconds and the result is clear — fits or flags. Paired with RimFit's photoreal visualization, the customer sees exactly how the wheel looks on their actual car and gets confirmation it fits, all before a dollar changes hands. Get the visualizer + fitment check for your shop on any car.
Why run a fitment check before issuing every quote
A return isn't just a refund — it's freight, a 10–25% restocking fee, a $60 labor charge to dismount, and a customer who probably won't be back. Most of these happen because no one ran a formal check before the sale closed: the customer said "I think mine's a 5x114.3," the employee trusted it, and two days later the wheel won't clear the caliper. The common counter mistakes are predictable — wrong offset for the trim, a tire width that rubs at full lock, and center-bore gaps that vibrate because no one specified hub-centric rings. Every one is preventable with a check that takes less time than the sales conversation. For a focused list of causes and pre-sale steps, see Wrong-Fitment Returns: Causes & Pre-Sale Checklist.
The check is the sale
A complete fitment check is just the right specs in the right order: start with bolt pattern and center bore (binary — it fits or it doesn't), then offset, backspacing, and clearance (where adjustment lives), then confirm with a calculator or fitment tool before the sale closes. Whether you do it by hand or with a tool like RimFit, the goal is the same: no surprises after the sale. Shops that make the fitment check standard on every transaction report fewer returns and more repeat customers — a process change that pays for itself immediately. More tips: the RimFit blog — wheel selling & fitment tips for shops. Run the check. Every time.
Frequently asked questions
What is a wheel fitment check?
A wheel fitment check is a quick, systematic verification that a set of wheels will physically and safely fit a specific vehicle. It confirms bolt pattern, center bore, offset, backspacing, diameter/width and tire clearance, and brake/suspension clearance (plus load rating on heavier vehicles) before the wheels are sold or installed.
What's the difference between offset and backspacing?
They describe the same wheel geometry from different sides. Offset is measured from the mounting face to the wheel's centerline; backspacing is measured from the mounting face to the back inner edge. Shops use backspacing to judge inner clearance against brakes and suspension — and because it changes with wheel width, it can reveal clearance problems that the offset number alone hides.
Why should a shop run a fitment check before every sale?
Because catching a mismatch after the sale means returns, restocks, comebacks for vibration or rub, and lost trust — even liability. A pre-sale fitment check confirms the wheel actually fits before money changes hands, turning a preventable loss into a confident recommendation at the counter.
Can a fitment check be automated?
Yes. Tools like RimFit run the full check automatically the moment a wheel is selected — comparing the vehicle's OEM spec to the wheel's bolt pattern, offset, hub bore, and clearance and flagging mismatches before a quote is issued. It removes the guesswork, though final fitment should still be confirmed against manufacturer specs.
Show customers their car — before they buy
RimFit is the AI wheel visualizer built for tire & wheel shops.
RimFit for shops →